Wednesday, August 21, 2019

Christmas Cardinal


Who doesn't love a bright red cardinal in the snow?  This image is from the Toile Christmas set, which is one of my favorites out of the new SU! Holiday mini catalog.  It pairs perfectly with the Toile Tidings DSP and the Christmas Cardinal dies.

The key to the cardinal is in the coloring.  I watercolor using an Aquapainter and take the ink straight off the ink pads.  The whole cardinal, other than the beak, leg and eye are lightly washed in Real Red.  Shadows are painted with Cherry Cobbler and solidified with a bit of Merry Merlot.  The beak is layered Daffodil Delight and Pumpkin Pie.  Highlights are added with a white get pen, which makes everything pop!

All products used are Stampin' Up!, unless otherwise noted 
Stamps:  Toile Christmas 
Paper:  Very Vanilla, Cherry Cobbler, Toile Tidings DSP 
Ink:  Black Memento, Real Red, Cherry Cobbler, Merry Merlot, Daffodil Delight, Pumpkin Pie, Pear Pizzazz, Garden Green, Soft Suede, Early Espresso 
Accessories:  Bit Shot, Christmas Cardinal dies, Deco Labels framelits, Real Red woven textile ribbon, Metallic brads, Aquapainter, Dimensionals, Ticket-Corner punch


Sunday, August 18, 2019

Christmas Shaker Card!


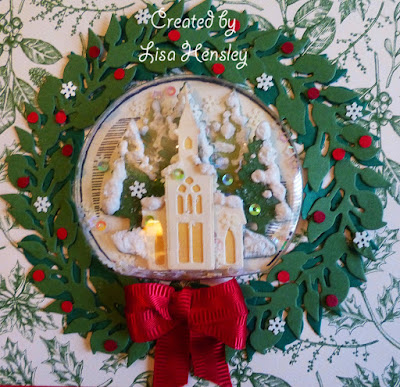
This shaker card was made with a variety of items from the new Stampin' Up! Holiday mini catalog, available September 4!  The Snow Globe Scenes dies come with not only the die cut to perfectly fit the Snow Globe Shaker Domes, but also with dies that will fit into the shaker domes themselves -- a cabin in the winter snow, tree outlines, church buildings, deer, polar bear.  As you can tell, they are perfect for layering in your snow globe!


For my snow globe, I cut two from the tree shape -- one out of Garden Green and one in Pear Pizzazz.  Set those aside for a moment, and cut one of the church with the steeple and one of the lower church out of Whisper White, then cut another set out of So Saffron for the windows.  Layer the So Saffron pieces behind the white, so that your church windows glow, then using Dimenionals, pop the church/steeple over the low building.  Using the Snowfall Accents Puff Paint and your heat gun, add some snow to the roofline of your church.

Now that you've got all your shaker pieces cut out, you can start to assemble them.  Cut apart the Pear Pizzazz trees and discard one.  The other two, paint a light coat of Mod Podge (Plaid) and sprinkle with a little of the Ice Stampin' Glitter from the holiday mini.  Then add some Snowfall Accents puff paint to the edges of your trees and heat carefully with your heat gun.  The paint will puff up immediately -- it's very cool!  Then do the same steps (Mod Podge, Ice glitter and puff paint) to the Garden Green trees and at the "base" of the trees.  Using Dimenionals, pop the Garden Green trees in front of the Pear Pizzazz trees.

Using one more set of Dimenionals, layer the church over the little snow covered forest.  Taking a 3" x 3" piece of white, stamp the snow globe from the Still Scenes stamp set in Black Memento, then adhere your tiny scene inside the stamp snow globe outline.  

From experience, I can tell you that your need to put your shaker contents on the center of the snow globe scene before you attach the snow globe dome.  I didn't the first time and tried to get the glitter/sequins in through the top of the dome.  No bueno -- glitter herpes everywhere, sorry to say!  A truly frightening moment.  Any way, you use the snow globe outline shape from the dies to cut a hole in your DSP, so that your snow globe will poke through.  It's also worth a moment to say that the domes have adhesive on the front and back, so that you'll make sort of a card stock "sandwich" with the dome in the center.

The wreaths are from the All Around Wreath dies.  Cut one from Garden Green and one from Shaded Spruce then layer them.  Add some "berries" with the punchies from a small hole punch, in Real Red and Cherry Cobbler, and add tiny snowflakes from the Snowflake Sequins assortment here and there. Add a pretty bow and a sentiment from Toile Christmas and you're done!

I hope you enjoy!
All products are Stampin' Up!, unless otherwise noted 
Stamps:  Toile Christmas 
Paper:  Whisper White, So Saffron, Pear Pizzazz, Garden Green, Shaded Spruce, Toile Tidings DSP 
Ink:  Black Memento, Shaded Spruce 
Accessories: Big Shot, All Around Wreaths dies, Snow Globe Scenes dies, Ticket Corner punch, Real Red woven satin ribbon, Snow Globe Shaker Domes, Snowfall Accents puff paint, heat gun, Dimenionals, Snowflake sequins, Ice Stampin' glitter, small round hole punch, Iridescent sequin assortment, Real Red 1" ruched ribbon, metallic brads                      
Christmas Toile


Pretty, pretty cardinal!  This is one the new sets from the SU! Holiday mini, which will be available September 4.  When purchasing a major new stamp set, you've got not only the option to buy the stamp set/die cut bundle for a discount, but you can also buy the whole suite of products all at once -- ribbon, die cuts, stamps and all the accessories.  It's a fantastic way to get all the coordinating Stampin' Up! product at one time.

This beautiful little pretty was watercolored, using a white gel pen to capture highlights.  The wreath is cut from Garden Green and Shaded Spruce using the Christmas layers dies, then layered.  It's then decorate with tiny white snowflakes from the Snowflake sequins assortment and small hole punches from Real Red and Cherry Cobbler card stock.

All products are Stampin' Up!, unless otherwise noted

Stamps:  Toile Christmas 
Paper:  Very Vanilla, Real Red, Cherry Cobbler, Garden Green, Shaded Spruce, Toile Tidings DSP 
Ink:  Memento Black, Real Red, Cherry Cobbler, Soft Suede, Pumpkin Pie 
Accessories:  Big Shot, Christmas Cardinal & All Around Wreaths dies, metallic brads, Dimensionals, white gel pen, 1/8" circle punch, Snowflake sequins, Real Red woven satin ribbon, Ticket-Corner punch


The Heartbreak of Glitter Herpes...


This is a new set from the SU! Holiday mini -- Still Scenes.  The set also comes bundled with the matching set of die cuts, called Snowglobe Scenes.  I paired the bundle with Stampin' Up! Snowfall puff paint and the iridescent Snowflake sequins, for the shaker material.  This was my first (finished) attempt at a shaker card.  Trust me, the road was long and glitter covered.


The puff paint is really the star of this card.  You squeeze it on your image, then heat it with your heat tool to activate.  I just kept adding to it to get the "depth" of snow that I wanted.  

Also, after several false starts, I figured out that if I wanted a Coastal Cabana background, I needed to stamp onto Coastal Cabana and once onto Whisper White.  Trying to watercolor the Coastal Cabana onto white card stock isn't going to work very well!  So, I used a Soft Suede marker to color the leafless trees behind the house.  That's all.  Then I went to the same image that I'd stamped on white and watercolored the house, evergreen, bush and front yard, adding accents with a white gel pen, then fussy cutting the whole image out.  The the cut out watercolored image got carefully glued on top of the image on the Coastal Cabana.  I added the puff paint, heated it, and voila!  Cute snowy house with the Coastal Cabana background.

Now for the tricky part -- the dome and the glitter.  Stampin' Up was great in that the Snow Globe Scenes die cuts give you one that exactly cuts out the snow globe shape, as well as the perfect shaker dome.  After heartbreak and a severe case of glitter herpes, I discovered that you do not attach the dome in any way, then try to feed in the shaker materials.  The dome goes on crooked and there was too much shaker material -- looked liked the plows had come through after a huge blizzard.  I had to start completely over.  The second time around, I piled what looked like a small amount of shaker stuff in the middle of the image, then carefully attached the dome. Worked like a charm!

By the way, a word to the wise.  The domes have sticky strip on both sides of the dome, so I attached the bottom edge of the dome to the Coastal Cabana (with said shaker material safely sealed away!), then used the dome-shaped die cut in the Let It Snow dsp.  I pulled the paper backing off the sticky strip around the top of the dome, settled the dsp into place and affixed it to the whole finished dome.

All product is Stampin' Up!, unless otherwise note 
Stamps:  Still Scenes, Toile Christmas 
Paper:  Whisper White, Coastal Cabana, Tranquil Tide, Real Red, Let It Snow dsp, silver glimmer pape 
Ink:  Black Memento, Tranquil Tide, Real Read, Cherry Cobbler, Daffodil Delight, Soft Suede, Garden Green 
Accessories:  Big Shot, Snow Globe Scenes dies, 1" Real Red ruched ribbon, Dimenionals, Aquapainter, Snowflake Sequins, Ice Stampin' glitter, metallic brads, Snow Globe Shaker Domes


Tuesday, August 6, 2019

Free as a Bird, part 2


Did you ever have one of those days when you started out going one direction, and you ended up in totally different place?  Thinking that you wanted one card, one set, one layout and did a total 360?  Well, that was my afternoon!  

I really wanted to work on coming up with a good layout for a 2-step stampin' project with To a Wild Rose.  I stamped.  I die-cut, which led to fussy cutting.  Changed paper, layouts -- couldn't make it work.  Too much line, too much stamped color -- not enough watercolor.

So, this is where my mojo sent me today -- back into the Land of the Shabby!

All products are Stampin' Up!, unless otherwise noted

Stamps:  Free as a Bird 
Paper:  Whisper White, Petal Pink, Minto Macaron, Bird Ballad DSP, Magnolia Lane Memories & More card pack 
Ink:  Black Memento, Mint Macaron, Garden Green, Crumb Cake, Soft Suede, Rococo Rose, Petal Pink, So Saffron  
Accessories:  Big Shot, Stitched Framelits, Ticket Corner punch, metallic brads, assorted iridescent sequins, aquapainter, Dimensionals