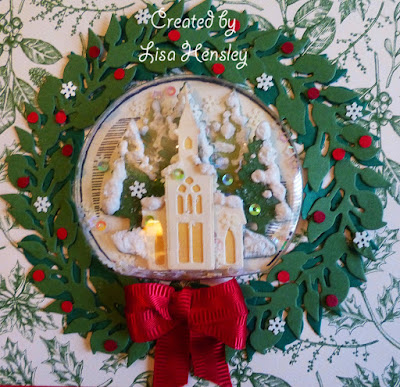
This shaker card was made with a variety of items from the new Stampin' Up! Holiday mini catalog, available September 4! The Snow Globe Scenes dies come with not only the die cut to perfectly fit the Snow Globe Shaker Domes, but also with dies that will fit into the shaker domes themselves -- a cabin in the winter snow, tree outlines, church buildings, deer, polar bear. As you can tell, they are perfect for layering in your snow globe!
For my snow globe, I cut two from the tree shape -- one out of Garden Green and one in Pear Pizzazz. Set those aside for a moment, and cut one of the church with the steeple and one of the lower church out of Whisper White, then cut another set out of So Saffron for the windows. Layer the So Saffron pieces behind the white, so that your church windows glow, then using Dimenionals, pop the church/steeple over the low building. Using the Snowfall Accents Puff Paint and your heat gun, add some snow to the roofline of your church.
Now that you've got all your shaker pieces cut out, you can start to assemble them. Cut apart the Pear Pizzazz trees and discard one. The other two, paint a light coat of Mod Podge (Plaid) and sprinkle with a little of the Ice Stampin' Glitter from the holiday mini. Then add some Snowfall Accents puff paint to the edges of your trees and heat carefully with your heat gun. The paint will puff up immediately -- it's very cool! Then do the same steps (Mod Podge, Ice glitter and puff paint) to the Garden Green trees and at the "base" of the trees. Using Dimenionals, pop the Garden Green trees in front of the Pear Pizzazz trees.
Using one more set of Dimenionals, layer the church over the little snow covered forest. Taking a 3" x 3" piece of white, stamp the snow globe from the Still Scenes stamp set in Black Memento, then adhere your tiny scene inside the stamp snow globe outline.
From experience, I can tell you that your need to put your shaker contents on the center of the snow globe scene before you attach the snow globe dome. I didn't the first time and tried to get the glitter/sequins in through the top of the dome. No bueno -- glitter herpes everywhere, sorry to say! A truly frightening moment. Any way, you use the snow globe outline shape from the dies to cut a hole in your DSP, so that your snow globe will poke through. It's also worth a moment to say that the domes have adhesive on the front and back, so that you'll make sort of a card stock "sandwich" with the dome in the center.
The wreaths are from the All Around Wreath dies. Cut one from Garden Green and one from Shaded Spruce then layer them. Add some "berries" with the punchies from a small hole punch, in Real Red and Cherry Cobbler, and add tiny snowflakes from the Snowflake Sequins assortment here and there. Add a pretty bow and a sentiment from Toile Christmas and you're done!
I hope you enjoy!
All products are Stampin' Up!, unless otherwise noted
Stamps: Toile Christmas
Paper: Whisper White, So Saffron, Pear Pizzazz, Garden Green, Shaded Spruce, Toile Tidings DSP
Ink: Black Memento, Shaded Spruce
Accessories: Big Shot, All Around Wreaths dies, Snow Globe Scenes dies, Ticket Corner punch, Real Red woven satin ribbon, Snow Globe Shaker Domes, Snowfall Accents puff paint, heat gun, Dimenionals, Snowflake sequins, Ice Stampin' glitter, small round hole punch, Iridescent sequin assortment, Real Red 1" ruched ribbon, metallic brads


No comments:
Post a Comment